Stokes Purple® Sweet Potatoes – Two Ways

We’re carrying a fun new (to us) produce item this year – Stokes Purple® Sweet Potatoes.  These sweet potatoes are unique in a number of ways – they are a patented, certified non-GMO crop that used to be grown exclusively on family farms in Stokes County, North Carolina as an alternative to tobacco.  They are now being grown by a number of different farms and growers, including AV Thomas Produce, the largest conventional and organic sweet potato producer in the US, located in Livingston, CA.

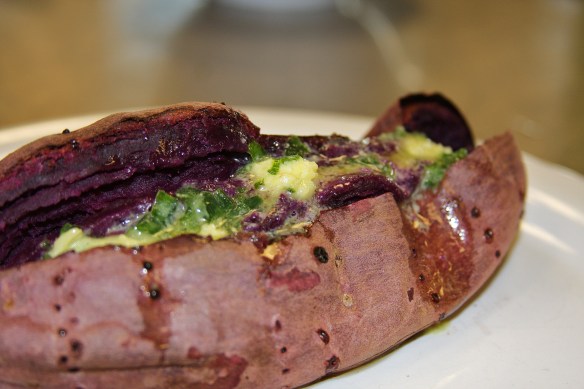
We were very excited when the boxes of organic purple sweets started coming in from our distributor, and produce staff took some home and tried them right away.  We thought it’d be fun to feature them in a Thanksgiving demo because not too many people are familiar with them.  Their flesh and skin are both a deep purple, which becomes more pronounced with roasting (boiling them does take away a bit of their vibrancy, but they are still pretty).  They are such a beautiful  deep purple that they are now being used as natural food coloring, and they are also being studied as having anti-colon cancer benefits.  But first and foremost, my, they are tasty!

I decided to cook them a couple different ways for my in-store demo.  Commonly sweet potatoes are served as a sweet side dish, but they really do work as a savory dish as well.  For my more traditional dish I roasted them with a honey glaze and for the other I roasted them whole and served them with a white miso scallion butter that was surprisingly delicious (I’ve never mixed miso with a dairy product before, but this pairing with the scallions really worked well).  Customers really enjoyed both flavors, and many couldn’t decide which they liked better and planned to make both on Thanksgiving!  I personally loved the savory version with the miso butter as it could be an unexpected dish at the traditional table.  These recipes are so easy you can also make them both and decide for yourself!

Happy Thanksgiving!

Roasted Purple Sweet Potatoes with Honey Glaze

Roasted Purple Sweet Potatoes with Honey Glaze © Sassy Sampler 2013

Roasted Purple Sweet Potatoes with Honey Glaze

Recipe adapted from http://www.epicurious.com

INGREDIENTS

  • 2 1/4 pounds purple sweet potatoes (or any sweet potato), peeled and cut into 1 1/2-inch pieces (about 7 cups)
  • 6 T butter or margarine (3/4 stick)
  • 3 T honey
  • 1 t fresh lemon juice
  • Salt and pepper

INSTRUCTIONS

  1. Preheat oven to 350°F.
  2. Arrange sweet potatoes in 13×9 glass baking dish.
  3. Stir butter, honey, and lemon juice in a small saucepan over medium heat until butter melts.
  4. Pour butter mixture over sweet potatoes and toss to coat.
  5. Sprinkle generously with salt and pepper.
  6. Bake sweet potatoes until tender when pierced with a skewer, stirring and turning occasionally, about 50 minutes.

Makes 6 servings
Roasted Sweet Potatoes with Honey Glaze PDF

Roasted Purple Sweet Potato with Scallion Butter

Roasted Purple Sweet Potato with Scallion Butter © Sassy Sampler 2013

Roasted Purple Sweet Potatoes with Scallion Butter

recipe adapted from http://www.epicurious.com

INGREDIENTS

  • 8 small and slender Sweet Potatoes (or garnet yams) – 4-5 pounds total, washed.  I recommend purple sweet potatoes or Japanese sweet potatoes.
  • 1 1/2 sticks unsalted butter or margarine, well softened
  • 1 1/2 T miso paste (preferably white)
  • 3 T finely chopped scallion (green onions)

INSTRUCTIONS

  1. Preheat oven to 450°F with the rack set in the upper third of the oven.
  2. Prick potatoes all over with a fork and put on a foil–lined large baking sheet.
  3. Bake until very soft when squeezed, 45 minutes to 1 hour.
  4. While the potatoes bake, stir together butter, miso, and scallion until combined.
  5. Slit hot potatoes lengthwise and, using oven mitts, push sides in to puff up the potato insides.
  6. Serve with some scallion butter in the center of each potato, with additional scallion butter on the side.

8 Servings
Roasted Sweet Potatoes with Scallion Butter PDF

Your Right to Know

Yes on 522 logo-horizThe Community Food Co-op supports YES on I-522 and believes that all consumers have the right to know what is in their food.  The Co-op has always been a huge proponent of transparency with the consumer, and we have worked to educate our customers about the food they purchase since our organization was formed over 40 years ago; we have worked to educate consumers about genetically modified foods since the mid-90’s.  While the co-op endorses the Yes on 522 campaign, what follows is my opinion on the issue.

64 Countries graphic with earthWe believe that transparency is an integral part of our business, on every level. I believe that transparency within the food industry in general should be a given – you know the old saying “you are what you eat”…well, how are you supposed to know what you are if you aren’t allowed to know what you are eating?  I’ll admit that food is a huge part of my life – I’ve been employed by the food industry since I started working at 15 and I grew up (in part) in farming country.  I’ve worked for the co-op for almost 17 years, and strongly believe in the services we provide to our community and to the natural foods industry in general.  This is the first time in 20 years of being a registered (and annually active) voter that I have spoken up about a ballot initiative.

I’ll be voting YES on 522 for many reasons, but the primary one is that I believe it is every consumers right to know what ingredients are in their foods.  Consumers should have a choice on whether they want to purchase foods containing GMOs, just like we have the choice to purchase foods that are high (or low) in fat, contain certain allergens, or ones that contain high fructose corn syrup.

Voting pamphlets have now gone out and should already be in your mailbox – I would like to address some of the arguments against I-522 and the misleading statements that are being made about this initiative.

  • “For decades, agricultural biotechnology has helped improve food crops so they resist disease, require fewer pesticides or are more nutritious.”

This is untrue on many levels – not only have GMO crops failed to increase yields, but they are also responsible for creating super weeds, pesticide resistant crops, and have not been proven to be more nutritious (I couldn’t find anything on the internet to substantiate this claim on either end, as any studies that have been done are biased and industry based).  Not only have GMO crops not supplied the world with more affordable food, but they have been banned from a number of countries (many of which were the ones that we were supposed to “help” through the process), and 64 countries  require labeling of foods that contain GMOs.

  • “Today, 70-80% of grocery products include ingredients from these foods, and they’re deemed safe by the FDA and major scientific and medical organizations.”

While this isn’t untrue, it is very misleading.  This is from the FDA’s website: “FDA encourages developers of GE plants to consult with the agency before marketing their products. Although the consultation is voluntary, Keefe says developers find it helpful in determining the steps necessary to ensure that food products made from their plants are safe and otherwise lawful.  The developer produces a safety assessment, which includes the identification of distinguishing attributes of new genetic traits, whether any new material in food made from the GE plant could be toxic or allergenic when eaten, and a comparison of the levels of nutrients in the GE plant to traditionally bred plants.  FDA scientists evaluate the safety assessment and also review relevant data and information that are publicly available in published scientific literature and the agency’s own records. The consultation is complete only when FDA’s team of scientists are satisfied with the developer’s safety assessment and have no further questions regarding safety or other regulatory issues.”  What this essentially means is that it is a purely voluntary system that is based only on what information is made available to the public – which is supplied by the developer (note that they aren’t even referred to as farmers!) that is applying for the certification.  StarLink corn is a perfect example of how this system is set up to fail.  Check out Wenonah Hauter’s book Foodopoly for a wealth of information on why the USDA, the EPA, and FDA don’t always have the consumers best interests at heart.

  • “…I-522 wouldn’t even give consumers a reliable way of knowing which foods contain GE ingredients.”

Once again, this is a misleading statement.  While I feel I-522 may not cover everything it should, it is a great start.  All of the major manufacturers would be required to label any products that contain GE ingredients, farmers would have to label GE crops, and smaller manufacturers wouldn’t be exempt either.  Just because everything wouldn’t be required to be labeled under this initiative doesn’t mean that providing the information on the ones that would be required to be labeled is a bad idea.  I’d rather have some of the information than none at all.

  • “…studies show I-522’s Washington-only labeling requirements would hurt local farmers and increase an average family’s food costs by hundreds of dollars per year.”

Washington farmers support I-522, and there is no reliable way to know if food costs will indeed rise – the anti-campaign says they will, and the pro-campaign says they won’t.  My take is this – with 22 other states preparing legislation that will either ban or require labeling of GMO products, cost increases will eventually happen regardless of our state’s outcome.  Companies who choose to source non-GMO ingredients for their products rather than labeling may have increased costs that will be passed on to the consumer, but the cost to the companies for adding the label will be nominal and won’t (and shouldn’t be) be transferred to the consumer – companies change their packaging all the time to indicate “now made with whole grains” or “new and improved” and the like, and this adding this language to their packaging shouldn’t be any different.

  • “Existing food labels already give consumers the option to choose foods without GE ingredients by choosing products labeled “certified organic”.”

While this is true, it is also a little elitist in my opinion.  Yes, you can decide to purchase only certified organic foods, but a lot of people in our state either don’t have the access that we do in Whatcom County or don’t feel they can afford to purchase only organic foods.  By not requiring labeling of GMOs, we are allowing big business to limit your right to make informed decisions.  It shouldn’t matter if you are rich/poor, liberal/conservative, or young/old – you should be allowed to make your own informed choices on what you choose to eat.

I was thrilled to find out that the Co-op would be taking such an advocacy role in the Yes on I-522 campaign, as I feel that this is one issue that we have always been very transparent about our position on – since the mid-90’s we have worked to increase consumer awareness of GMO products through massive letter writing campaigns, signage in our stores, and the election of the Non-GMO Project’s Executive Director through a member vote to our own Board of Directors, just to name a few.  We have held several educational events, open to the public, in the last month in support of I-522 that have been well attended and chock full of information (the last one we have planned is this Monday, October 21st from 6:30pm-8pm at our Cordata store Roots Room – you can learn about non-GMO corn preservation from local experts Krista Rome and Courtney Pineau).

For more information on GMOs and food industry advocacy visit:

Center for Food Safety

Non-GMO Project

Yes on I-522

Food and Water Watch

Videos endorsing I-522


Antipasto Sausage Skewers

Inspired by Skagit Valley Co-op’s great success in making homemade sausage, our Meat departments have perfected their own sausage blends.  We’re using whole pork shoulder from Salmon Creek Farms and a blend of herbs and spices (never any preservatives) to create our mild Italian, Breakfast, and Chorizo sausages – available as links or in bulk packages.  All three varieties are available at both of our locations, plus you can also purchase hot Italian sausage at our Downtown store.

Photo © Sassy Sampler 2013

Photo © Sassy Sampler 2013

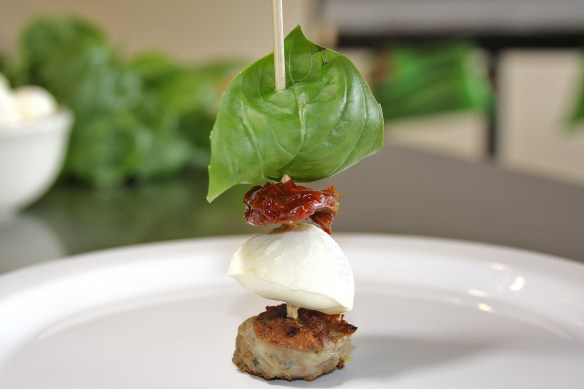
For my recipe demo yesterday, I decided to feature the mild Italian sausage.  After searching the web for a fun way to serve it, I ran across a recipe for antipasto (Italian for “before the meal”) skewers and thought I’d put my own spin on it.  Not only are these easy to make, but they look great on a plate and make a fantastic appetizer since you can serve them hot or cold.

I started with a specially made 18″ link of sausage (talk to our Meat department if you’d like make a request like this) and paired it with bocconcini mozzarella (those little balls of fresh mozzarella), Mediterranean Organics sun-dried tomatoes in olive oil, and some organic local basil from the Growing Garden.  I pre-sliced the sausage (with a really sharp knife) before cooking it in a frying pan over medium heat, and I let the slices drain and cool slightly before assembling my skewers.  They came together very quickly, and flew off the plate equally fast!  They smell divine and are very eye pleasing – a great combination in any dish!

Antipasto Sausage Skewers © Sassy Sampler 2013

Antipasto Sausage Skewers © Sassy Sampler 2013

Antipasto Sausage Skewers

INGREDIENTS

  • 1 package Co-op house made Italian Sausage, cut into ~1/2” chunks
  • sun-dried tomatoes in olive oil, cut into quarters—you won’t need the whole jar, just a piece for each skewer
  • 1 bunch fresh basil, washed and dried
  • Fresh mozzarella—either bocconcini or a log that has been cut into small chunks
  • Toothpicks or short skewers

INSTRUCTIONS

  1. In a skillet, cook sausage chunks until browned and fully cooked, about 8 minutes total.  Use a very sharp knife to make the cutting easier.  You can also cook the whole sausage and slice it afterwards.
  2. Drain sausage on a paper towel-lined plate and allow to cool slightly.
  3. Slide a basil leaf onto your skewer/toothpick.
  4. Slide a sun-dried tomato onto the skewer/toothpick until it almost touches the basil.
  5. Add the mozzarella to the skewer/toothpick.
  6. Finish by setting a flat side of sausage on the plate and skewering it so everything sits up vertically.
  7. Repeat with remaining ingredients.
  8. Serve immediately, or chill and serve at room temperature.

Variations:
Try substituting one or more of these items:

  • Roasted red peppers
  • Artichoke hearts
  • Smoked goat cheese
  • Spicy sausage
  • Fresh Roma tomatoes

Antipasto Sausage Skewers PDF

Cherry, Wild Rice, and Quinoa Salad

The end of June is always exciting because it heralds the beginning of cherry season in the Northwest, and this year’s (farmer direct) crop is as delicious as ever.  Although I demo’d a salad for my last blog post, summer is all about salads so I decided to try another one – Cherry, Wild Rice, and Quinoa salad.

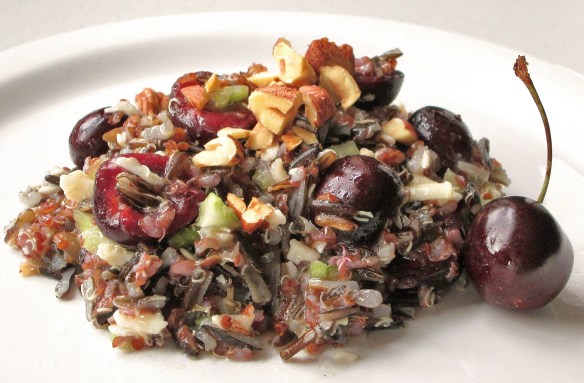
This salad is very easy to make, tastes great, and looks pretty as well.  I started with a recipe from the May/June 2012 issue of Eating Well magazine and adapted it to my liking.  I had never had wild rice and quinoa together before, and I’ve got to say that they taste fabulous.  The original recipe had you cooking the wild rice for a half hour and then adding the quinoa and cooking for another 15 minutes, but I’m in the habit of cooking quinoa with short grain brown rice for a full hour when I make it at home (in a pressure cooker, no less).  I cooked both grains together for 40 minutes and they both turned out tender and delicious!

Along with the WA cherries, I also used our locally grown and roasted hazelnuts from Holmquist Orchards in Lynden as well as Beecher’s Smoked Flagship Cheddar, made in Seattle at the world-famous Pike Place Market.  Both added a delicious element to the salad, along with the celery and apple cider vinegar dressing.  All in all, customers thought the salad had a nutty, smoky flavor made richer with sweet cherries…and I heartily agree!

Cherry, Wild Rice, and Quinoa Salad © 2013 Sassy Sampler

Cherry, Wild Rice, and Quinoa Salad © 2013 Sassy Sampler

Cherry, Wild Rice, and Quinoa Salad

Makes eight 3/4 c servings

INGREDIENTS

  • 3/4 c wild rice
  • 1/2 c red quinoa, rinsed well
  • 1/4 c extra virgin olive oil
  • 1/4 c apple cider vinegar
  • 3/4 t sea salt
  • 1/4 t fresh ground black pepper
  • 2 c halved & pitted fresh sweet cherries
  • 2 stalks celery, diced
  • 3/4 c coarse grated aged goat cheese or smoked cheddar (or you can dice it)
  • 1/2 c roasted hazelnuts, coarsely chopped

INSTRUCTIONS

  1. Bring a large saucepan of salted water to a boil over high heat.
  2. Add wild rice and quinoa, reduce heat to low, cover, and simmer for 40 minutes.
  3. While the rice is cooking, whisk oil, vinegar, sea salt, and pepper in a measuring cup and prep your other ingredients.
  4. Drain grains and rinse with cold water until cool to the touch; make sure you drain the grains well.
  5. Once cooled, add the rice/quinoa mixture to a large bowl.
  6. Add the cherries, celery, cheese, and hazelnuts and toss to combine.
  7. Add the dressing and toss to combine.
  8. Serve at room temperature, or cold from the fridge.

Quinoa (pronounced Keen-wah) is an ancient grain and was a staple in the ancient Incas’ diet.  Quinoa has a natural coating called saponin that needs to be rinsed off the grain before cooking (it can upset your stomach).  Rinse quinoa in cool water until the water is clear.  This is easiest done in a very fine sieve.

Cherry, Wild Rice, and Quinoa Salad PDF

Balsamic Rice and Bean Salad

triple choco mousse cake

Triple Chocolate Mousse cake

May is always a month of chocolate for me – both my husband’s and my birthdays are in May, along with five other family members (plus both of our cats) and everyone is a chocolate fan. For my husband, I made a truly scrumptious triple chocolate mousse cake, and for myself I made ganache filled “ultimate” chocolate cupcakes.   Both recipes came from Cook’s Illustrated and turned out fantastic.  If you would like a copy of either then let me know!  The mousse is (naturally) gluten-free and I adapted the cupcake recipe to be gluten-free.

Ultimate Chocolate Cupcakes

Ultimate Chocolate Cupcakes

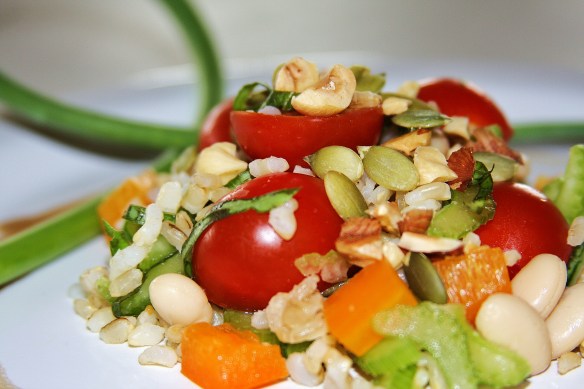
Due to my sweet-filled month, for my first demo in a while I thought it might be good to prepare and share a more wholesome recipe, and I found it in Tracy Hill’s cookbook Delightfully Free (she’ll be at Seattle’s Pike Place market today signing copies, and you can also buy it at the Cordata store).  Not only are the photos mouth-watering, but the recipes are pretty awesome too, and they are all gluten, dairy, and refined sugar-free!  I knew when I saw the photo for this salad that I wanted to prepare it – it would be a great salad to bring to a graduation party or BBQ, and would also serve as a well-rounded main course because of the combination of brown rice, beans, nuts/seeds, and vegetables.

We’re still at the beginning of our growing season here in the great Northwest, but I was able to purchase some local garlic scape to use instead of the green onions in the original recipe – I sliced them very thin (garlic scapes are typically cooked, but if you don’t overdo it then they are great in a salad) and they added just the right amount of fresh tasting garlicy-ness.  We have local basil in stock, and I also used some of the local roasted hazelnuts that we carry in our bulk department.

The salad was very popular with customers and those that tasted it wanted to know how soon they could buy it pre-made in the deli (I did give a sample to our Cordata Deli Manager with the feedback…hopefully you’ll see our version soon!).  I’ve included instructions on how to cook brown rice and beans from scratch, but you can always grab some pre-cooked rice from the Deli’s Grab and Go section and a can of beans to cut down on your time in the kitchen.

Enjoy!

Balsamic Rice and Bean Salad © 2013 Sassy Sampler

Balsamic Rice and Bean Salad © 2013 Sassy Sampler

Balsamic Rice and Bean Salad

adapted from Delightfully Free by Tracy Hill

INGREDIENTS

  • 1 1/2 c cooked (and cooled) brown rice
  • 1 1/2 c navy or cannellini beans, cooked from dry or 1 can Great Northern Beans, rinsed and drained
  • 1 c chopped celery (I sliced them pretty thin)
  • 1 1/2 c chopped yellow or orange bell pepper (about 1 large pepper)
  • 1/3 c chopped green onion or garlic scapes
  • 1/2 c fresh basil leaves, torn or chopped (or chiffonade cut)
  • 1 c halved cherry tomatoes
  • 3/4 c Balsamic Dressing, or more to taste
  • 2/3 c chopped walnuts, hazelnuts, and/or pumpkin seeds

Balsamic Vinaigrette Dressing  (makes about 1 1/2 c)

  • 1/4 c red wine vinegar
  • 1/4 c balsamic vinegar
  • 1/2 c grapeseed oil
  • 1/8 t sea salt
  • 1 t agave nectar
  • 1 small garlic clove, pressed or minced
  • 2 T water
  • Small pinch of paprika
  • Pinch of xanthan gum

INSTRUCTIONS

  1. Shake all dressing ingredients together, except xanthan gum, in a jar with a tight-fitting lid.  Add the xanthan gum and shake again.  For smoother flavors, emulsify the dressing by mixing all ingredients, except xanthan gum, in a blender on high for 30 seconds.  Add the xanthan gum and blend again for 10 seconds.  Store in the refrigerator.
  2. In a large bowl, combine all salad ingredients, with the exception of the nuts/seeds and dressing.
  3. Toss salad with about 3/4 cup of dressing (or more if you like!) – be sure to give it a few good shakes to re-mix.
  4. Sprinkle the salad with the nuts/seeds when it is served, or you can mix them in just before serving.

Note from the cookbook author — This salad is extra tasty made a day ahead of time (keep the nuts/seeds set aside until you serve).  It is also a great topper for green salad.

Note from the Sassy Sampler – Customers commented that this salad would be great with parboiled green beans or with feta cheese sprinkled on top…and I agree!

To cook short grain brown rice:

Thoroughly rinse 3/4 c rice.  Add to a small bottomed pot with a tight-fitting lid and cover with 1.5 cups of water and sprinkle about 1/2 t of sea salt.  Allow to come to a boil and then cover with the lid, turn heat down to low and allow to cook undisturbed for 1 hour.  Remove from heat and let sit for 5 – 10 minutes, remove the lid, fluff, and enjoy!

To cook navy/cannellini beans:

Note—beans will expand to 2.5 times their normal size, so you will only need to cook 1/2 c beans for this recipe

  1. Go through the beans on a plate to remove any stones, dirty or damaged beans, etc.
  2. Pour the beans into a medium bowl and cover with water—remove any “floaters”.
  3. Drain beans and cover with at least 1 1/2 c of COLD water.  Soak the beans overnight (you can do this on the counter), or at least six hours.
  4. Rinse the beans three or four times until the water runs clear.
  5. Put beans in a pot and cover with fresh water.  Bring to a boil and simmer for 60-90 minutes, until beans are tender.  Add salt (if desired) only in the last few minutes of cooking time or your beans will take longer to cook.
  6. Cooked beans are best the next day and can be stored in the fridge for up to 4 days.

Visit Tracy’s website at www.delightfullyfree.com and check out her cookbook of the same name!

Balsamic Rice and Bean Salad PDF

Apple Pie Oatmeal Cookies…mmmmmmmmm

I’ve had a pretty busy month and haven’t been able to get a recipe together to sample for a few weeks now, but I’m back!

All month I’ve wanted to try to recreate something I used to eat often before I was diagnosed as gluten-intolerant…Erin Baker’s Breakfast Cookies. They are made within a few blocks of our Cordata neighborhood store, and they were easy to grab on the way to a morning meeting.  I looked at various recipes, and decided on one that I found on food.com that I felt had a good base.

Last weekend I drove to Hood River, OR for a preliminary meeting for this year’s Provender Alliance Conference at the beautiful Hood River Inn.  You may remember that last year I served as the conference kitchen food liaison and I’ve signed up again this year.  Susan (Provender’s Executive Director) and I met with the hotel catering/banquet managers and their head chef to plan another amazing conference buffet.  I decided a test batch of cookies for my trip was in order.

I found these cookies to be quite a bit different from a Baker’s cookie, but they were delicious nonetheless.  This oatmeal cookie is light and chewy, and extremely easy to put together.  After I decided on a few tweaks to the recipe (and a new name – they are reminiscent of apple pie), I knew I had a winner to share with everyone!

I would urge you to think about the ingredients you choose to use in this recipe, as they can make a difference in how it turns out.  Make sure you use a thick applesauce to get the correct consistency of batter.  I used Nana Mae’s Organics Mid-Season Heirloom apple sauce because it is made with 100% organic apples – no added sugar (and because it’s delicious).  One other key ingredient are the dried apple slices that I used.  We are now carrying some cinnamon apple slices in our bulk department made by GloryBee Foods, a family owned, natural foods ingredient wholesaler out of Eugene, OR.  While these slices do contain sugar, they are the most tasty dried apples I have ever tasted (besides homemade!) and work amazing in these cookies.  If you can’t find these slices at your local co-op or natural foods store, than regular dried apples will work but I would suggest re-hydrating them a little.

Enjoy!

photo of apple oatmeal cookies

Apple Pie Oatmeal Cookies © Sassy Sampler 2013

Apple Pie Oatmeal Cookies

makes 36 cookies

INGREDIENTS

  • 1 2/3 c flour—you can use a gluten-free blend or wheat flour
  • 1 t baking soda
  • 1/2 t sea salt
  • 1 1/2 t ground cinnamon
  • 3/4 c butter or margarine, softened (1 1/2 sticks)
  • 1/3 c sugar (can substitute coconut sugar, stevia sugar replacement, etc.)
  • 1/2 c packed brown sugar
  • 2 large eggs
  • 1 1/2 c applesauce (thick works best)
  • 1 c chopped dried apples
  • 3 c quick cooking oats (Bob’s gluten-free for GF version of cookie)

INSTRUCTIONS

  1. Preheat oven to 375°F.
  2. Line cookie sheets with parchment paper.
  3. Mix the flour, salt, cinnamon, and baking soda in a medium bowl.
  4. Cream the butter and sugars together in a stand mixer or with a handheld mixer (in a large bowl).  Scrape bowl as needed.
  5. With the mixer on, add the eggs one at a time and mix until combined.  Scrape down sides of bowl as needed.
  6. Add the applesauce on low-speed and mix until combined.  Scrape down the bowl.
  7. Add the flour mixture to the batter and mix until combined, scraping bowl as needed.
  8. Add the oats and apples to the now empty flour bowl and mix to combine.  Make sure to break up apple bits so they don’t stick together.
  9. Remove (cookie dough) bowl from mixer (if using) and stir in the oats/apples with a spoon.
  10. At this point, your dough should be moist and very light but very workable; if it seems too wet then add up to 3 T of flour, 1 T at a time, mixing between each addition.
  11. Using a small scoop or tablespoon, drop batter onto prepared cookie sheets.  Flatten cookie slightly, as they will not spread while cooking.
  12. Bake for 12-16 minutes, or until lightly browned along the sides and bottom.  Turn baking sheet halfway during cooking time to get an even bake.
  13. Cool on wire rack for about 5 minutes, then remove cookies from sheet to cool completely.

Cookies will keep in an airtight container at room temperature for 5 days.

You can also use coconut butter in place of the butter/margarine, but it will slightly effect the taste of the cookie, and you may need to adjust the cooking time.

Apple Pie Oatmeal Cookies PDF

Homemade Candy Corn

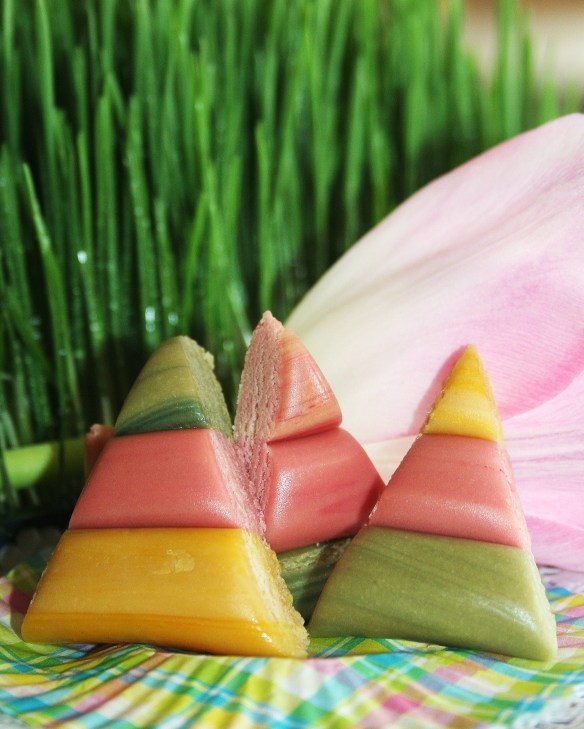
I am a big candy corn fan, but don’t tend to eat it because of the ingredients.  While looking for a fun candy recipe to demo this week, I ran across one for homemade candy corn on Serious Eats and couldn’t resist contacting the author to see if I could use her recipe, mostly because the photo of the candy was so darn cute!  It was created by Jessie Oleson Moore, of Cake Spy fame – she is based in Seattle and her blog is awesome if you are into the sweeter side of cooking (like I am!).

I only made one small change to her fabulous recipe – instead of using corn syrup I used organic light agave syrup (I’ll note that we do sell organic corn syrup at our Co-op if you’d prefer to use that).  We also sell some really cool natural food dyes by India Tree – they are made from turmeric, beet and vegetable juice in a glycerin base.

These little candies were super easy to make (you just need a little elbow grease to get the food coloring worked in) and taste so much better than the commercial candy corn on the market…and they are organic (excluding the food coloring).  You don’t even need a candy thermometer!  Customers (and staff) who tried them thought they were very tasty and had a nice caramel-like aftertaste.  I will be making these again for sure!

photo of homemade candy corn in pastel colors

Homemade Candy Corn © 2013 Sassy Sampler

Homemade Candy Corn

recipe adapted from Serious Eats/Cake Spy

INGREDIENTS

  • 2 1/2 c organic powdered sugar, sifted
  • 1/3 c organic powdered milk
  • 1 c organic granulated sugar
  • 2/3 c organic light agave syrup
  • 1/3 c organic salted butter
  • 1 t organic vanilla extract
  • Food coloring

INSTRUCTIONS

  1. In a medium-sized bowl, whisk the powdered sugar and powdered milk together.  Set aside.
  2. In a medium saucepan, combine the granulated sugar, agave syrup, and butter over high heat, stirring frequently, until it comes to a boil.
  3. Reduce heat to medium, add the vanilla and continue stirring frequently for five minutes—the mixture will begin to reduce and thicken.
  4. Remove pan from the heat.  Stir in the powdered sugar/milk mixture a little at a time, stirring after each addition until all the dry mixture has been mixed into the wet mixture.
  5. You can either leave the dough in the saucepan or turn it out into a bowl sprinkled with powdered sugar until it is cool enough to be handled.
  6. Divide the dough into as many sections as you’d like to create colored segments for your finished candy, and place them in small separate bowls.  Mix each mound of dough with food coloring until you reach your desired color.  Hint—you may want to wear gloves so your hands don’t get stained, and the longer you wait the harder the dough will be to work with.
  7. On top of a sheet of waxed or parchment paper, roll out each color of dough into a long thin rope.  The thinner the rope, the smaller that segment of color will be in your finished candy.  I divided my dough into three colors and made four 17” ropes of each color (they were about 3/8” thick).
  8. Press together your ropes of dough in whatever color combination you’d like.  To make sure that each segment sticks together, press a second sheet of waxed or parchment paper on top and press with a rolling-pin or your hands.
  9. Using a very sharp knife, cut the dough into triangle segments.  Keep a damp, clean cloth on hand to wipe off the knife if it gets sticky.
  10. Let the finished kernels set for an hour or two before serving.

Note from the original recipe author — up the cute quotient by placing a dab of green frosting in the inside of a lid of an empty baby food container and place 2-3 kernels on top, then screw the lid into the jar bottom-side up to create a magical forest of an Easter Corn terrarium.

Homemade Candy Corn PDF

Homemade Peppermint Patties

Keeping with my annual tradition of finding a fun and easy recipe for Valentine’s Day, this week I decided to make one of my husband’s favorite treats – peppermint patties.  I must say, they were a BIG hit when customers sampled them yesterday and I gave out a record number of recipes! 

I found a great recipe on Taste of Home that only used five ingredients – sweetened condensed milk, powdered sugar, peppermint flavor, chocolate chips, and some shortening (all of which you can buy organic and trans-fat free at the Co-op).  This recipe is fun because you can shape the peppermint dough however you like, something I realized after I had made all my patties for my recipe demo – I’ll pat the dough flat and use a small cookie cutter to shape them as little hearts for the holiday!  It also comes together relatively quickly – it took me about 20 minutes to make the dough and shape the patties, plus chill time, and then it took me about 10-15 minutes to coat them with chocolate, plus chill time.

© Sassy Sampler 2013

© Sassy Sampler 2013

One thing I learned from this recipe is that I will always put a little oil in my chocolate from now on if I am using it to cover candies – I’ve always had difficulty with getting a nice even coating of chocolate when I make things like this, and the shortening added to the chocolate in this recipe really makes a difference.  If you are averse to vegetable shortening (we carry an organic 100% palm oil version), or just don’t have any on hand, I think that coconut oil would be an acceptable substitute.

If you are vegan and are craving some of these homemade candies, I suggest making this coconut version of sweetened condensed milk created by Sunny B on her gluten/dairy-free recipe blog – I think it would work great in this recipe.

…I’ll also mention that our Bakery has developed a vegan peppermint patty that will be available soon – I got to sample one and they are yummy!

Mmmmm...organic peppermint patties! © Sassy Sampler 2013

Mmmmm…organic peppermint patties! © Sassy Sampler 2013

Homemade Peppermint Patties

adapted from Taste of Home

INGREDIENTS

  • 3/4 c organic sweetened condensed milk
  • 1 1/2 t organic peppermint flavor (use less if you use real extract)
  • 3—4 c organic powdered sugar (up to 1#)
  • 3 c (18 oz) organic fair-trade dark chocolate chips
  • 2 t organic vegetable shortening (or organic coconut oil)

INSTRUCTIONS

  1. In a bowl, combine milk and peppermint flavor.
  2. Stir in 3 c powdered sugar, to form a stiff dough. Once you have initially incorporated the sugar into the milk mixture, it is easiest to finish mixing with your hands.
  3. Knead enough remaining sugar to form a dough that is very stiff and no longer sticky.
  4. Working quickly, shape into 1” balls (really compact the dough) and place on a waxed paper or parchment lined baking sheet.
  5. Flatten balls into 1 1/2” disks.Place cookie sheet in the freezer for half an hour, flipping them after 15 minutes (don’t freeze them for longer than that).
  6. Melt the chocolate chips and shortening in a double boiler or in a heatproof bowl over about 1” of boiling water, stirring frequently. The chocolate is easiest to work with when it remains hot, so once the water is boiling and the chocolate has melted, turn off the heat but keep the bowl on the pot to keep the chocolate warm.
  7. Place a fork under a patty and dip in the chocolate mixture; tap fork against the side of the bowl gently and scrape excess chocolate off the bottom of the patty using the side of the bowl.
  8. Place patty on waxed or parchment paper to harden—you can either do that at room temperature or in the fridge.

These have a great shelf life—keep them in an airtight container (separate layers with parchment paper) in the fridge for up to a month.

Chocolate Peppermint PattiesPDF

Super Yummy Gluten-free Bagels

Baking bread has always been my weak point…until I made these awesome bagels this morning. I haven’t been able to find an acceptable pre-made gluten-free bagel and was about ready to give up – you could hardly call what is available a real “bagel” and it’s one of the few bread items I still crave from time to time since starting a gluten-free diet. I decided that today was the day I would try my hand at making some from scratch, and I am so glad I did!

My bagels before I boiled them. © 2013 Sassy Sampler

My bagels before I boiled them. © 2013 Sassy Sampler

I looked at a number of recipes before I chose one to try, and most were basic bagel recipes that simply had gluten-free flour substituted in for the wheat flour. I didn’t feel that would produce a bagel that was any better than the packaged ones, so I kept looking. I found what I was looking for on Food.com – this recipe contained eggs and milk, which I felt would help with the dryness factor that is so common in GF breads. I was a little nervous since this recipe was so different from the others, but after preparing it (it took about an hour total) I found my nervousness was unfounded – the bagels looked like they could have come from the Bagelry (a local favorite) and they smelled great. I have to say that this is officially one of my favorite recipes now!

Bagels have been boiled, sesame seeds sprinkled, and egg washed. © 2013 Sassy Sampler

Bagels have been boiled, sesame seeds sprinkled, and egg washed. © 2013 Sassy Sampler

They came out of the oven a beautiful golden brown and I couldn’t wait for them to cool before I cut into one…pause for a moment of bliss please! Once they had cooled, I cut into another and ate it un-toasted and with no accoutrements – delicious! I imagine that after the first day you’ll have to toast them like any other gluten-free bread, but that doesn’t bother me one bit. They were so good that my wheat-eating husband asked if I was going to make a batch at home so we could have “eggels on bagels” this weekend (what we call a scrambled egg and bagel sandwich – we used to love to make these on the weekends with Bagelry bagels, pre-gluten intolerance). My enthusiastic answer was YES!!!

Gluten-free Bagels © 2013 Sassy Sampler

Gluten-free Bagels © 2013 Sassy Sampler

Gluten-free Bagels

Note – see PDF version for recipe update

Makes 6 bagels

INGREDIENTS

  • 2/3 c lukewarm milk (plus 2 T)
  • 2 T active dry yeast
  • 3 T sugar (three 1 T portions)
  • 1 c gluten-free potato starch *
  • 1 c gluten-free cornstarch *
  • 1/2 c tapioca flour *
  • 1/2 t baking soda
  • 2 t baking powder
  • 2 t xanthan gum
  • 1 t sea salt, plus more for topping
  • 2 eggs + 1 egg
  • 1/2 t apple cider vinegar
  • Sesame seeds or other topping
  • Cooking oil for baking sheet/Cornmeal (optional) – to put on the cookie sheet under the bagels

INSTRUCTIONS

  1. In a small bowl, combine the (lukewarm) milk and 1 T sugar. Stir briefly to help dissolve the sugar. Add the yeast (stir to disperse granules) and let sit for about 10 minutes until it is foamy on top.
  2. Preheat oven to 375°F. Put on a pot on to boil, with about an 1 1/2 – 2 inches of salted water in it.
  3. In a large bowl, whisk together potato starch, cornstarch, tapioca flour, baking soda, baking powder, xanthan gum, 1 T sugar, and 1 t sea salt. Create a “well” in the middle of the flour.
  4. Scramble 2 eggs in a bowl and add the vinegar; mix to combine.
  5. Add the egg and yeast mixtures to the flour “well” and mix well with a rubber spatula to combine and remove all the lumps.
  6. Flour your hands and divide dough* into 6 evenly sized dough balls. Press a hole into the center of each ball with your thumbs and shape it into a bagel—they will rise, so make sure your hole isn’t too small, it should be about the size of a quarter. You can place them on a sheet of parchment paper.
  7. Add 1 T sugar to the boiling water.
  8. One at a time, gently place a bagel into the boiling water. Boil for about 1 minute, gently flipping the bagel after about 30 seconds—the crust will be thicker and chewier the longer you boil them and the interior will be denser.
  9. Remove the bagel from the water (use a large slotted spoon if you have one or a spatula) and place it on a greased baking sheet (you can also skip the oil and instead sprinkle cornmeal on the sheet).
  10. Sprinkle sesame seeds and sea salt over the bagel immediately once it comes out of the water (or whatever topping you have chosen, or none at all) and brush gently with an egg wash (see below). Repeat steps 9 and 10 for the rest of the bagels.
  11. Bake for 18-20 minutes, or until golden brown.
  12. Allow to cool on a wire rack.

Bagels can be frozen.

To make egg wash:

  1. Beat one egg in a small bowl.
  2. Add 2 T milk or water and beat the mixture until combined.
  3. Spread egg wash over the top of the uncooked bagels with a pastry brush.

* Be careful when measuring your flours – if you use even a little more than what is listed then your bagels will turn out dry. If your dough seems a bit dry when you are done mixing, add more milk (start with 1 T) – your dough should be (slightly) sticky and feel kind of delicate when shaping the bagels.

Using an egg wash will give you a shiny and crunchier crust.

Gluten-free Bagels PDF

I haven’t made these, but here is a link to a vegan gluten-free bagel recipe that I thought sounded promising – I wouldn’t recommend adapting the recipe above to be vegan.

Kevin Gillespie’s Root Vegetable Soup

Last summer Top Chef Kevin Gillespie came to our co-op because he was hosting a video series sponsored by Stronger Together, being filmed for the International Year of Cooperatives.  Our co-op was chosen to take part in the series because of our involvement with our community.  He attended our summer party and visited Heritage Lane Farm, Misty Meadows Farm and Bellingham Urban Garden Syndicate (BUGS) to talk about their relationship with our co-op and our community.

Kevin Gillespie 7.31.11Before he left town, I got to go out to dinner with him and the film crew and we talked a lot about food (of course!) as well as his upcoming (and now published) cookbook Fire in my Belly.  It’s a great read – lots of photos, a fun layout, and anecdotes from the author.  He told me I could demo any of his recipes any time and with the icy fog abounding in our region, I thought his Root Vegetable Soup recipe would be just about perfect for my recipe demo this week.

© 2013 Community Food Co-op

© 2013 Community Food Co-op

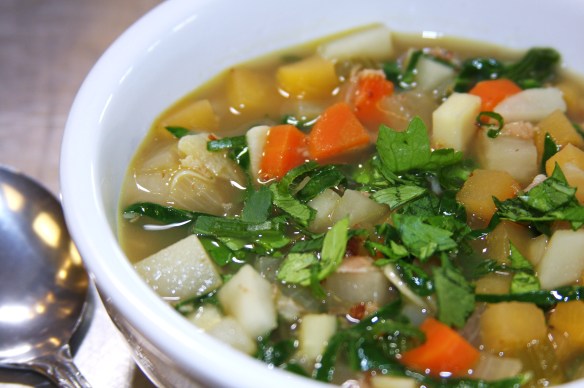
This is a recipe he created based on a dish his grandma used to make.  It is very simple to make, although it does require some knife skills as all the veggies need to be cut into the same size pieces to cook correctly.  I must admit that it was my first time preparing some of the root vegetables in this dish, and it was also a great excuse to use some of the delicious local produce we still have in stock (organic Jerusalem Artichokes, aka sunchokes, from Rabbit Fields Farm in Everson).  The recipe calls for turnip greens, which we do carry occasionally but are out of currently, so I substituted collard greens.  Other than that I was pretty true to the original recipe, except for cutting it down to 4 servings (you can find the original recipe for 8 servings in Kevin’s book).

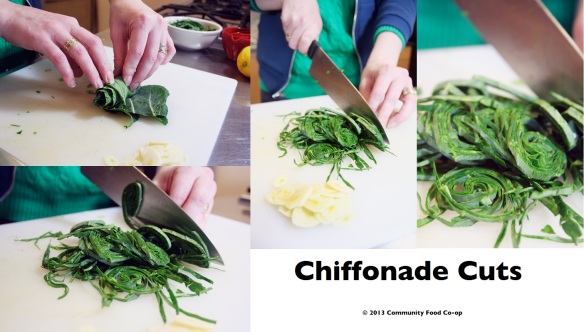
ChiffonadeOne of my favorite cutting techniques is chiffonade – you roll your leafy greens into a roll and cut thin little ribbons.  They are so pretty and you can cut through a pile of greens in no time.  As for cutting the various root vegetables into a small dice, you will have to expect some waste as you first have to square off the edges of the veggies so you are left with flat edges to cut your dice from.  If you need a little guidance for safe and effective cutting techniques, you can check out the video and photos at Stella Culinary.

Root Vegetable Soup © 2013 Community Food Co-op

Root Vegetable Soup © 2013 Community Food Co-op

Root Vegetable Soup

adapted from Fire in my Belly by Kevin Gillespie with David Joachim, used with permission

INGREDIENTS

  • 4 oz Pancetta or unsmoked bacon, diced into 1/4” pieces (vegetarian option below)
  • 1 1/4 c onion, diced 1/4”
  • 2/3 c rutabaga, peeled and diced 1/4”
  • 1/2 c celery, diced 1/4”
  • 1/3 c carrots, peeled and diced 1/4”
  • 3/4 c sunchokes (Jerusalem Artichoke), peeled and diced 1/4”
  • 3/4 c turnips, peeled and diced 1/4”
  • 1/2 c parsnip, peeled and diced 1/4”
  • 2 large cloves of garlic, thinly sliced (a mandolin works great for this task)
  • 3 c chicken stock (or vegetable stock)
  • 1/2 pepper
  • 1 t sea salt
  • ~ 2 c Turnip greens or Collard greens, sliced into chiffonade (thin strips)
  • Juice from one lemon

GARNISH

  • ~1/8 c Italian parsley, minced
  • ~1/8 c chives, very thinly sliced
  • ~1/8 c celery leaves, minced

INSTRUCTIONS

  1. Heat a large enameled cast-iron pot or other soup pot over medium heat.
  2. Add the pancetta, stir, and cook until the pancetta is golden brown, about 8 to 10 minutes.
  3. Add the onions, rutabaga, celery, and carrots and cook until the vegetables start to soften and the onions become translucent, about 6 minutes, stirring now and then.
  4. Add the sunchokes, turnips, and parsnips and cook for an additional 8 minutes, stirring a few times.
  5. Stir in the garlic and cook just until fragrant, about 1 minute.
  6. Stir in the chicken stock, pepper, and salt.  Bring the mixture to a boil, then cut the heat down to low, cover, and simmer for 5 minutes.  The vegetables should be just tender.
  7. Remove the pot from the heat, and stir in the turnip greens and about 1 T lemon juice.  Taste and season as needed with additional salt and lemon juice.
  8. Ladle into bowls and garnish with the parsley, chives, and celery leaves.

Tips from the Top Chef:

  • Don’t be tempted to mince the garlic here.  It should be sliced. If you mince it, the small pieces will cook faster and develop a bitter taste.  The slices also contribute to the texture of the soup.
  • If you want to make the soup ahead, prepare it up to the point of simmering the vegetables in the seasoned stock.  Cool it down, and refrigerate it for up to 2 days.  Then reheat the soup and add the greens and lemon juice just before serving and garnishing.
  • If you don’t have the root vegetables listed, then you can substitute with what you do have.  The most important thing is to dice all the vegetables the same size so they cook quickly and evenly before the liquid is added.  The vegetables retain better shape and flavor this way.

Root Vegetable Soup PDF

For a vegetarian version, use vegetable stock in place of chicken stock; sauté 4-5 shiitake mushrooms (cut into thin slices about a 1/4″ wide) over medium heat in 1-2 T butter or a fatty oil until they are soft, about 7 minutes, and proceed with the rest of the recipe.  Alternately you can use vegetarian bacon, prepared and cooked just like the pancetta in the recipe.  Neither will give you the same rich flavor of the pork, but either should add some umami to the dish.